Ok so to clarify.
The data produced by the sketch is used to move a plotter. they way i am building it, the processing sketch needs to send ONE number (ascii between 0 and 9) , wait for the arduino to finish physically moving, before sending the next single number.
I am intending to use ASCII commands, therefore between each movement i was thinking of using "ACK" and for the carrige returns, "CR"
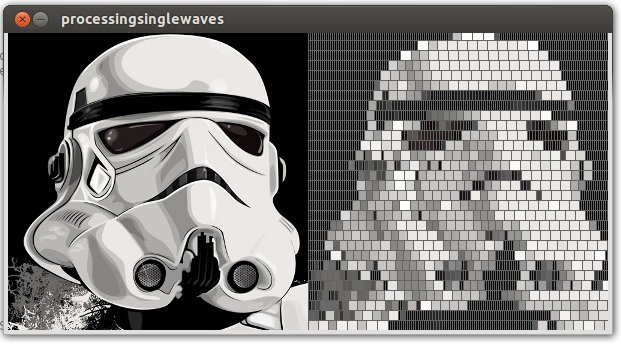
here is an example image:, the darker blocks will be represented by a 9, the white ones, by a 0.
![]()
The code works, the serial connection works, however the processing sketch and the arduino do not acknowledge each other. I would like them to take it in turns to do what they need to do.
I have tried many various examples and tutorials, however none of them have worked in this scenario.
maybe i am not using the ASCII bytes correctly It doesnt help that ALL the tutorialsi have found work the other way around, with the arduino waiting for processing. Therefore, in frustration i have stripped out all the references to "bufferUntil"
here is the code, without any attempt at the serial response. Any suggestions would be greatly appreciated.
http://pastebin.com/f6x7QuQj
The data produced by the sketch is used to move a plotter. they way i am building it, the processing sketch needs to send ONE number (ascii between 0 and 9) , wait for the arduino to finish physically moving, before sending the next single number.
I am intending to use ASCII commands, therefore between each movement i was thinking of using "ACK" and for the carrige returns, "CR"
here is an example image:, the darker blocks will be represented by a 9, the white ones, by a 0.

The code works, the serial connection works, however the processing sketch and the arduino do not acknowledge each other. I would like them to take it in turns to do what they need to do.
I have tried many various examples and tutorials, however none of them have worked in this scenario.
maybe i am not using the ASCII bytes correctly It doesnt help that ALL the tutorialsi have found work the other way around, with the arduino waiting for processing. Therefore, in frustration i have stripped out all the references to "bufferUntil"
here is the code, without any attempt at the serial response. Any suggestions would be greatly appreciated.
http://pastebin.com/f6x7QuQj
- /* sends shades in single waves, using an int, to keep track of total steps made per row (x axis).
- */
- import processing.serial.* ;
- Serial myPort;
- PImage img1;
- int Ysize = 10; // height of the rows
- int squareSize = 300; // size of the working frame
- float greyscalein; // inward greyscale reading of 0- 255
- byte greyscaleround; // converted and rounded down to whole bytes for transmission (0 - 9)
- int xprogress = 0; // integer for keeping track of progress across image
- int stepsize = 0; // integer for transmitting how far to move the motors per step
- void setup() {
- size(squareSize * 2, squareSize); // frame is twice image width. Original image on the left, processed image on the right.
- println(Serial.list());
- myPort = new Serial(this, Serial.list()[0], 9600);
- }
- void draw() {
- background(0); // background - 0 is black
- img1 = loadImage("STRS.jpg"); // image, 300 x 300 (STRS or grad)
- imageMode(CENTER);
- image(img1, (squareSize/2), (squareSize/2)); // draws the image, centred
- for (int y = 0; y < squareSize; y = y + Ysize ) {
- // "carrige return" instruction from processing to the arduino will go in here (probably)
- for (int x = 0; x < squareSize; x = x + stepsize) {
- color c = get(xprogress, y + Ysize/2);
- float greyscalein = brightness(c); // Sets 'greyscale' to 255-0
- greyscalein = map(greyscalein, 0, 255, 48, 57); // maps the resolution of the trsnamisted data from 0-255, to 0- ???
- int greyscaleround = round(greyscalein); // rounds the floating value of the greyscalein(read from c) to a whole number (greyscaleround)
- print("Greyscale:");
- print(greyscaleround-48); //show the greyscale, adjusted from ascii so that 0 is black
- myPort.write(greyscaleround); // send it to the arduino
- delay (0); // delay for easy reading of monitor
- // *** this section is for printing of the preview in the processing window.It is not required by the arduino.***
- stepsize = ((greyscaleround - 46)*1);
- fill(c);
- stroke(100); // bounded by a box, dark grey
- rect(squareSize + xprogress, y, squareSize + xprogress + stepsize, y + Ysize);
- xprogress = xprogress + stepsize;
- print(" ; stepsize:");
- println(stepsize); //show the size of the step taken on the monitor
- delay (00);
- }
- xprogress = 0; // reset x-progress before going to next line (y axis)
- }
- }